Custom Search

Download a Website

Publicat de Mr. Miaghy on 01:53 comentarii (0)


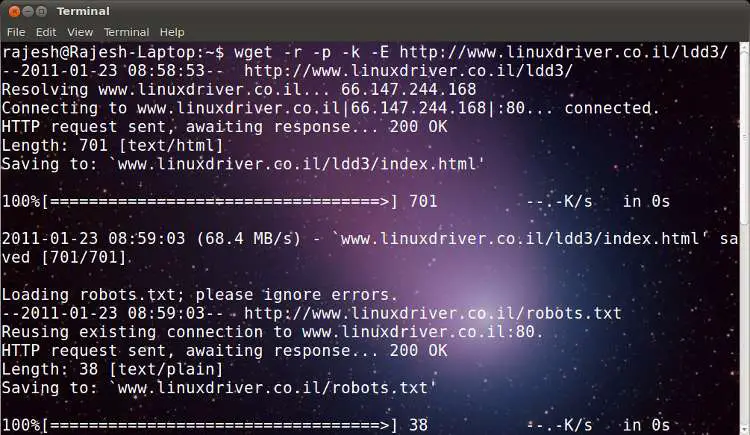
Here is a simple and effective way to get the files downloaded recursively from a website without actually visiting each and every link to the sub pages. This is also useful in case the pages are of type XHTML or text type—one can make them .html by use of an appropriate switch like -E. Go to the directory onto which you wish to download all the content from site, and use the following command:
 wget -r -p -k -E http://www.linuxdriver.co.il/ldd3/
…where:
-r is for recursive download of pages
-p is for linking pages locally so that users
can browse them easily once the download is
completed
-k is to create the directory structure, and…
-E is to create .html extensions to the type XHTML or text files.
Enjoy, and try out different contents on the Net. Do not forget to check out the manual pages for wget there’s always more information.
Download Website   Download a Website

How to verify Technorati Claim Token – WordPress

Publicat de Mr. Miaghy on 03:26 comentarii (0)


According to Wikipedia “Technorati is an Internet search engine for searching blogs, competing with Google and Yahoo!”. Adding a blog to Technorati blog directory can help with SEO, as well as for increasing the traffic of your site. Technorati generates us a unique code for each blog, whenever you submit your blog.
We guess many of you may do not care about the verifying process of Technorati claim token, So we decided to write a tutorial on how to verify Technorati claim token which will be useful for many other blogger’s. Here are the steps we followed for verifying our Technorati claim.
1. First Make sure you know your RSS Feed Link.
2. Open wordpress DASHBOARD. Expand Posts Selection -> Click on Add New.
3. Expand Posts Selection -> Click on Add New -> then As Post title you can give anything. (i.e. Technorati Token).
4. In Body Section Just Paste your Techorati Token which you have got through e-Mail. and Publishpost. In my case the code is WS629AFT24N4  You can delete this post after you claimed your blog.
4. After publishing the post, make sure your claim token is visible in your RSS feed.
5. Login to your Technorati account and click check claim for your blog.
6. Click on the verify claim token.
So If All goes right then just wait for few minutes and you will get message something like this “We have successfully crawled your blog and found the claim token, and your claim is now awaiting review. “
Note :- Once your blog get updated on Technorati then you can delete this published post with Technorati Token Code.

15 Highly Recommended WordPress Plugins

Publicat de Mr. Miaghy on 01:58 comentarii (0)


WordPress is one of the most powerful blog publishing and content management application with over 25 million users across the globe. WordPress Plugins can extend WordPress to do almost anything you can imagine. Plugins offer custom functions and features so that each user can tailor their site to their specific needs. In this article we are mentioning the highly preferred plugins for every WordPress users. We personally recommend each of them to you.
Highly Recommended WordPress Plugins   15 Highly Recommended WordPress Plugins

Must Have WordPress Plugins for Every Blog:

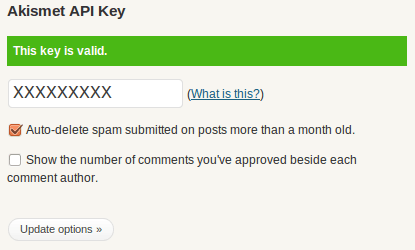
Akismet – Comes installed with WordPress by default. All you have to do is get an API Key to activate it. Akismet is quite possibly the best way to protect your blog from comment and trackback spam. It keeps your site protected from spam even while you sleep.
Akismat API Key   15 Highly Recommended WordPress Plugins
After activating this plugin, you simply have to provide WordPress.com API key to kick start it. You can optionally choose to automatically discard spam on posts more than 1 month old.
All-in-One SEO – This is an ultimate necessity for your blog if you want to have any chance of ranking high in search engines. All in One SEO Pack allows you to add unique titles, meta description and keywords to each page of your blog and blog posts. (Read: Step by Step Guide to Configure All in one SEO Pack Plugin)
W3 Total Cache – The fastest and most complete WordPress performance plugin. Dramatically improve the speed and user experience of your site. Add browser, page, object and database caching as well as minify and content delivery network (CDN) to WordPress. It increases site performance and reduces the resource consumption.
Google XML Sitemap – This plugin will generate a special XML sitemap which will help search engines like Google, Yahoo, Bing and Ask.com to better index your blog. With such a sitemap, it’s much easier for the crawlers to see the complete structure of your site and retrieve it more efficiently. Additionally it notifies all major search engines every time you create a post about the new content.
Google XML Sitemap for Images – The Image Sitemap plugin will generate a sitemap for your WordPress blog with all the image URLs that are used in your posts and pages. Sitemaps are a way to tell Google, Bing and other search engines about web pages, images and video content on your site that they may otherwise not discover.
SEO Friendly Images – SEO Friendly Images is a WordPress SEO plugin which automatically updates all images with proper ALT and TITLE attributes for SEO purposes. If your images do not have ALT and TITLE already set, SEO Friendly Images will add them according the options you set. Additionally this makes the post W3C/xHTML valid as well. Improves traffic from search engines like Google, Yahoo, Bing and Ask.com
Fast Secure Contact Form – When running a blog you need to allow your users to contact you. This contact form lets your visitors send you a quick E-mail message. Blocks all common spammer tactics. Spam is no longer a problem. Includes a CAPTCHA and Akismet support. This is the best free contact form plugin to this date.
GTranslate – Get translations with a single click between 58 languages (more than 98% of internet users) on your website! This module uses Google Translate automatic translation service to translate your web page with Google power.
WordPress Database Backup – WordPress Database Backup allows you easily to backup your core WordPress database tables. You may also backup other tables in the same database.
WordPress Mobile Edition – WordPress Mobile Edition is a plugin that shows an interface designed for a mobile device when visitors come to your site on a mobile device. Mobile browsers are automatically detected, the list of mobile browsers can be customized on the settings page. Show your mobile visitors a site presentation designed just for them. Rich experience for iPhone, Android, etc. and clean simple formatting for less capable mobile browsers. Cache-friendly with a Carrington-based theme, and progressive enhancement for advanced mobile browsers.
SexyBookmarks – Adds an attractive social bookmarking menu to your posts, pages, index, or any combination of the three. Extremely useful and successful tool in getting your readers to actually submit your articles to numerous social bookmarking sites.
Breadcrumb NavXT – This plugin generates locational breadcrumb trails for your WordPress powered blog or website. These breadcrumb trails are highly customizable to suit the needs of just about any website running WordPress.
Subscribe to Comments – Subscribe to Comments is a robust plugin that enables commenters to sign up for e-mail notification of subsequent entries. The plugin includes a full-featured subscription manager that your commenters can use to unsubscribe to certain posts, block all notifications, or even change their notification e-mail address!
Comment Redirect – This plugin lets you redirect the attention of your new users to a specific page. So you can actually substitute the email sent out by Comment Relish plugin by a page on your site. Sometimes users might prefer this over the email. Check out our Thank You Page.
Broken Link Checker – This plugin will check your posts, comments and other content for broken links and missing images, and notify you if any are found.
We recommend these plugins for any new blog or existing blog. There are more plugins that would need to be added based on the niche and your needs. But for any generic blog, this should be a good list to start with.

How to configure .co.cc domain with blogspot|blogger

Publicat de Mr. Miaghy on 04:13 comentarii (2)


CO.CC is the world’s best free domain name registrar and the leading provider of Internet services. It’s not only URL forwarding but we can setup DNS Records, A, MX, and CNAME records, E-mail. Co.Cc has become the world’s #1 choice for free domains. We can change our blog’s name to become “name.co.cc”. It’s more simple than we use domain “name.blogspot.com”. To change our default blogspot name to co.cc domain name there are some steps to do. In this tutorial you will learn how to configure .co.cc domain with blogspot.com
1. First go to co.cc or check your domain name here.


Well, let’s get our point, below is how to set up or change blogspot domain with Co.CC:
Click here if you have not yet had your Co.CC domain. Please register first if you haven’t has your own account.
2. After you have your account, please sign in to www.co.cc with your account.
sign in   How to configure .co.cc domain with blogspot|blogger
Click the Getting A New Domain tab.
getting new domain   How to configure .co.cc domain with blogspot|blogger
Then regiter a domain name that you want to use.
Note: If it’s no available, you have to find another domain name. But if it’s available then you can register it.
register   How to configure .co.cc domain with blogspot|blogger
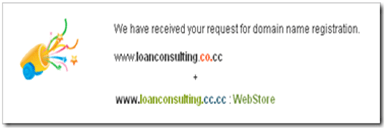
register request   How to configure .co.cc domain with blogspot|blogger
3.  Congratulations, you now have your own domain name of Co.CC. To be noted, you haven’t managed the setting to your new domain.
In order to do setting to your new domain of Co.CC you can follow these steps below:
1. Now you have to setup your domain.So as usual, sign in to your co.cc account, then click Domain Settings as you see at the screenshot below
domain setting   How to configure .co.cc domain with blogspot|blogger
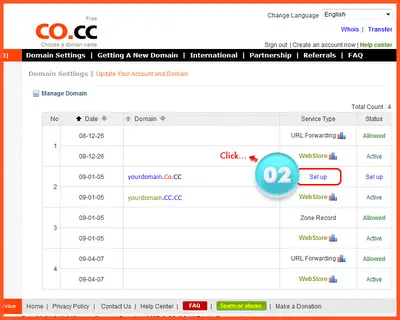
2. Go to “setup”
setup02   How to configure .co.cc domain with blogspot|blogger
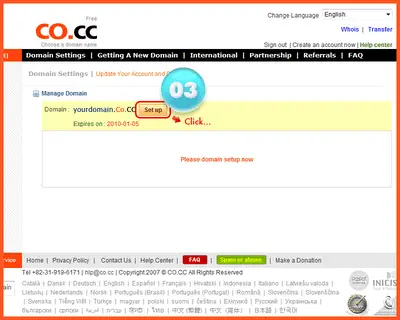
3.setup03   How to configure .co.cc domain with blogspot|blogger
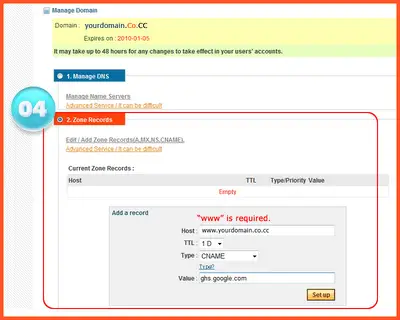
4. Go to “Manage domain”
setup04   How to configure .co.cc domain with blogspot|blogger
5. Choose “Zone Records“.
6. In the coloumn “Host” fill it with your domain name (www.yourdomainname.co.cc)
7. Choose “CNAME” for “Type”
8. In the “Value” box fill it with “ghs.google.com
9. Then click “Setup” Button.
Well, Now you have to some setup in your blogger account.
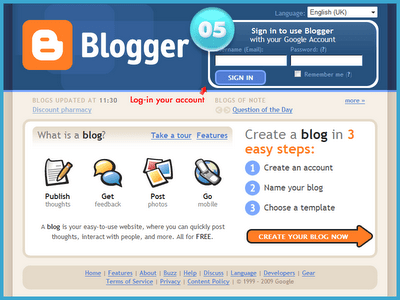
1. Now Login to your Bloggr dashboard.
process1   How to configure .co.cc domain with blogspot|blogger
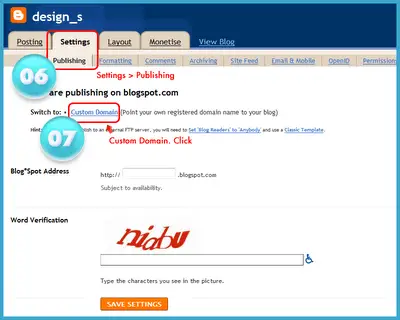
2.Go to Setting–>Publishing.
3. Then choose “Switch to: • Custom Domain”
process2   How to configure .co.cc domain with blogspot|blogger
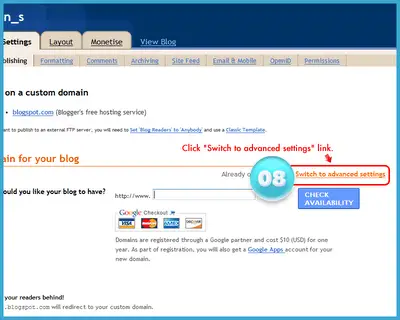
4. Then click Switch to advanced settings to change your blogspot domain with Co.CC domain.
process03   How to configure .co.cc domain with blogspot|blogger
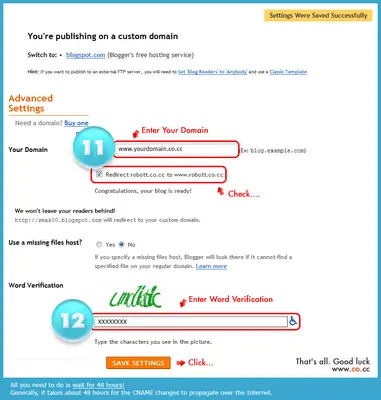
5. At the page of Advanced Settings fill with your Co.CC domain at the field of Your Domain e.g.www.tricksandtips.co.cc (It’s my Co.CC domain). The for Use a missing files host? Leave it as No and at the field of Word Verification fill with the words that appear with blur (colored and unclear). After all fields are filled out, click Save
process04   How to configure .co.cc domain with blogspot|blogger
Be sure that Save Setting is successful with the sign as the words Settings Were Saved Successfully at upper right of the page.

How to Create a Free Website or a Free Blog

Publicat de Mr. Miaghy on 02:25 comentarii (1)


In our earlier articles, we showed a way for users to How to configure .co.cc domain with blogspot|blogger. In this article, we will share with you a way that you can create a free website or a free blog.
You may have heard of lot of websites that offer Free Website Creation like www.weebly.com,webs.compeperonity.com, etc and Free Blogging like BloggerWordPress,etc.
Free Website   How to Create a Free Website or a Free Blog
You had given them a try once and then you thought of leaving it as the Website or Blog is not completely under you. You cannot change the Template yourself, cannot have Powerful control including all access to your Website as per their Service Terms, and tired of having their Advertisements on your Website.
Now, you need not do much for having your own website. You will have your website with Complete Control Panel, all Access to the Databases and Information, and Pages of your Website. Now you can Edit your Website according to your Choice.
Note: WordPress allows you to change themes from there 100 themes directory also you can not add extra plugins in wordpress. In blogger you can add any template.
:: WHAT TO DO FIRST ???
First, you need to select a Domain/Website Address from a Free Domain Provider or you can alsobuy it.
Free Domain Providers : CO.CCCZ.CC
(Remember, If you are using any other Provider, then it should have the ability to Forward Name Servers of the Domain. Else, use these which I’ve given.)
Premium Provider (at low cost): NAMECHEAP.COM
Now, to Host this Domain, you need a Hosting to host your website. This is a Developing World and now it is very easy to Find a Service you want on Internet for FREE !!! So you can also look for a Free Web Hosting.
However, there’s a lot of Difference in Premium and Free Hosting in lots of Service Options like Server Guarantee, Performance, Loadtime, No. of Subdomains, Databases, Email Accounts and many other things which you will not get in Free Hostings.
But for a Normal Internet User, who just wants to setup his/her website which is not much popular to World but just to his/her Friends, the Free Hosting is the Best.
These are Free Hostings which provide on the spot Registration and Account Creation. Create a Account on Hosting with the Domain you’ve Registered. (Some Hosting force Users to Register for a Sub Domain first like yourname.hostingname.com etc. In that case, Register using a Sub Domain First and then by going into the Control Panel or Settings, Add your Own Domain by changing the Domain Name or through the Parked Domains Settings.)
Now, You need to Point your Domain to the Hosting or in short, you have to join Domain and Hosting. You will be provided with some Name Servers with the Web Hosting. These Name Servers will allow you to point your Domain to a particular Hosting Server, i.e, where you are going to Host website. Note Down the Name Servers. In the Domain Settings, from where you’ve registered the Domain, you will Find the Settings for Forwarding Name Server. Just Paste the Name Servers in the Settings, and you will be done.
Setup   How to Create a Free Website or a Free Blog
Now, when you have your Own Domain and a Hosting for Host your Domain, then you just need to Host/Upload the pages to your Hosting, so that everyone can visit your website’s pages.
:: WHAT KIND OF PAGES ???
Now, you can either make your Own pages either using a Free Software to create pages likeFrontpage or Dreamweaver etc or can Host FREE Website Scripts which are widely available on Internet now.
After creating the pages, just Upload them to your Website’s Server either through Control Panel(mostly provider by every Hosting) and then have fun!
Or if you want to host a bit large website which contains pages for VideosArticles and includes the services for Message Sending and everything which is Social, then you should Host aReady-made Scripts for that.
You can also see that all Scripts in a single place also. Most Hostings provide some in built Auto Scripts Installer in their Control Panel like Fantastico De LuxeSoftaculous etc. You can install free blogging software like wordpress with this Auto Scripts Installer.
Or you can also find some good scripts and can Upload it yourself. Most of them require the files to upload and requires a Database to do settings for website. You can make Databases through Control Panel. Most of the Hosts provide Cpanel for their Users and Everything is available in Cpanel. You can also have a DEMO of it on Cpanel’s Website.

You can Host Free Scripts like : WordPress, PHP FusionPHP NukeDrupalXoops,DolphinJoomlaZikula, etc.

The Advantages of these Scripts are that there is so many applications and services which is easy to use but hard to make. So you can easily use it without Coding. Also, there are many Plugins, Mods, Addons and Modules available for them which can be easily installed you. You can place advertise to earn money icon smile   How to Create a Free Website or a Free Blog
We hoped that you enjoyed this useful article. Don’t forget to share it. If you have some suggestion about this article, share it on our comment below.

Custom Search